재미있는 사이트 하나 소개합니다.
아이콘(ICON) 또는 아이콘 팩(ICON Pack)이 필요하다면,
http://findicons.com 사이트를 방문해 보세요.

아이콘을 ICO 포맷, ICNS 포맷 및 PNG 포맷으로 다운로드 할 수 있으며,
검색 결과에 대해 크기별, 색깔별 필터링(filtering)이 가능합니다.

RSS 피드 가입을 하면 새롭게 업데이트 되는 아이콘 팩 정보를 얻을 수 있습니다.

재미있는 사이트 하나 소개합니다.
아이콘(ICON) 또는 아이콘 팩(ICON Pack)이 필요하다면,
http://findicons.com 사이트를 방문해 보세요.
아이콘을 ICO 포맷, ICNS 포맷 및 PNG 포맷으로 다운로드 할 수 있으며,
검색 결과에 대해 크기별, 색깔별 필터링(filtering)이 가능합니다.
RSS 피드 가입을 하면 새롭게 업데이트 되는 아이콘 팩 정보를 얻을 수 있습니다.
1. 특정 사이트에서만 검색하도록 site: 연산자 사용하기
예를 들어 'hosup.textcube.com'에서만 'Windows'이라는 단어를 검색한다면,
Windows site:hosup.textcube.com 이라고 입력합니다.
2. define: 연산자로 키워드에 대한 정의(Definition)만 검색 결과로 얻기
예를 들어 'virtualization'에 대한 정의를 검색하고자 한다면,
define:virtualization 이라고 입력합니다.
3. 구글 검색을 계산기로 사용하기
굳이 계산기 프로그램을 사용할 필요 없이 110 * (654/8 + 3) 이고 입력하면,
110 * ((654 / 8) + 3) = 9 322.5 와 같이 계산 결과를 보여줍니다.
4. 환율 변환
10000 won in dollars 이라고 입력하면,
10 000 원 = 8.95 dollars 와 같이 결과를 보여줍니다.
5. 특정 키워드를 포함하는 검색 결과는 제외
“american idol” -cowell 이라고 입력하면, "american idol"에 대한 검색 결과 중
cowell이 포함된 것은 제외시킨 결과만 보여줍니다.
6. 특정 파일 형식을 포함하는 검색 결과를 얻고 싶을 때
cloud computing filetype:ppt 이라고 검색하면, cloud computing 검색 결과 중
ppt 파일이 포함된 결과만 보여줍니다.
7. .. 연산자를 사용하여 숫자 범위 지정하기
Olympics 1970..1990 이라고 검색하면, 1970년부터 1990년까지 개최된
올림픽 경기만을 검색 결과로 보여줍니다.
클라우드 상의 스토리지 저장 공간 (예: Windows Live Sky Drive 서비스)을 [내 컴퓨터]상의 특정 로컬 드라이브로 매팅하여 사용할 수 있는 프로그램을 소개합니다.
Gladinet에서 만든 "Cloud Desktop"이라는 프로그램을 사용하면 이와 같은 서비스 사용이 가능합니다. Windows Live Sky Drive 이외에도 추가 가능한 스토리지 서비스 리스트는 다음 그림과 같습니다.
Administrator 암호 분실 시, 시스템 복원(System Restore) 기능을 사용하여 다시 Administrator 계정에 접근할 수 있는 방법입니다. 이를 위해 Win7 설치 DVD가 필요합니다.
1. 먼저 Win7 설치 DVD로 부팅합니다.
2. [지금 설치(Install Now)] 메뉴에서 [컴퓨터 복구(Repair your computer)] 항목을 클릭합니다.
3. [시스템 복구 옵션(System Recovery Options)] 메뉴에서 "Windows 7"을 선택하고, '다음(Next)' 버튼을 누릅니다.
4. [시스템 복원(System Restore)] 항목을 선택합니다. 그리고, 나열된 시스템 백업 지점 중에서, Administrator 계정으로 로그온 불가능하였던 시점 보다 충분히 이전 복원 지점을 선택하여,
시스템 복원을 진행합니다.
단, 이 방법은 [시스템 보호] 기능이 활성화 되어 있는 상태에서만 적용 가능한 시나리오입니다.
기타 다른 방법에 대해서는 다음 링크를 참조하십시오.
Forgot your Windows password? How to recover your lost password? Try Login Recovery!
출처: How to convert a PDF file to Word, Excel or JPG format
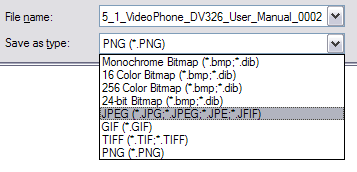
Go to ZamZar.com, browse for your file and choose PNG format for the format to conver to under Step 2. PNG is another newer picture format that is slowly replacing the JPG format. Most programs that can open JPG files can open PNG. Zamzar automatically converts each page in the PDF document into it’s own PNG picture file. Now you can simply open Microsoft Paint (yes, all you need it Paint!) and choose File – Save As from the menu and choose JPEG from the drop down list of formats.
That’s it! By the way, if youare interested in how to extract the text from a PDF document or how to convert Word files to PDF, etc, check out the links.
The first thing you’ll need to do is download a free software (the only one I could find) that converts PDF documents to JPEG image format automatically. Go to the Omniformat download page and download both Omniformat v8.3 and the PDF995 app. You will need to download and install PDF995 first before installing Omniformat. Once you have both programs installed, go to your Start Menu programs, find the program group Software995 and click on Omniformat.
The only annoying thing about this program is that it requires you to view some ads for about 30 seconds! However, it’s better than paying $20 or $40 for a program just to do a simple conversion! It does pop up another instance of your browser window for the web site of each of the sponsors, but it does not install any spyware onto your computer (no popup ads). Once the program is loaded, you’ll see it has a section called “Watch Folders” and then a button at the bottom titled “Start Monitoring” and “Single Pass“.
Basically the way it works is that you need to COPY the PDF files you want to convert to JPG format to the C:\omniformat\watch folder and then press Single Pass. The program will look in that directory and convert each page of each PDF into a separate JPG file. If you click Start Monitoring, you can keep dropping PDFs into that folder and the program will automatically convert them into JPGs as long as the program is open. Note that the program DELETES the original PDF document that it uses, so that’s why you need to COPY the PDF document to the watch folder, not move it! You should now see your converted files like below:
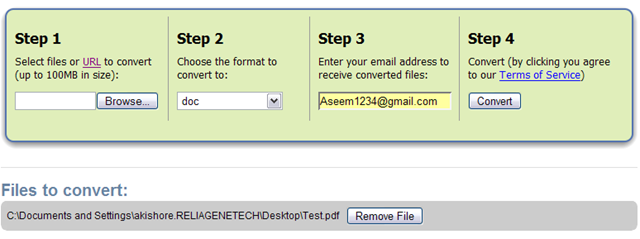
Go to Zamzar.com and click the Browse button next to Step 1 and choose your file. By default, Step 2 will be set to DOC format, but you can choose to convert your PDF to other file types such as TXT, HMTL, RTF, etc. Type in your email address for Step 3 and click Convert.
You should receive an email within a few minutes with a download link to your converted file. I have tried out this service on some pretty complex PDF documents with text in multiple columns, multiple images, etc and have been very impressed with it’s conversion accuracy.
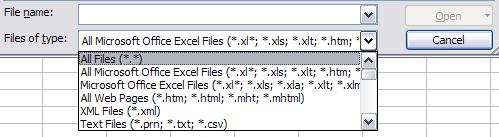
We will again follow the steps above using Zamzar, but this time choose TXT as the format you want to convert to. Unfortunately, you can’t convert straight to Excel format, so we’ll have to go through the intermediary TXT format. Once you have downloaded the TXT file and saved it on your computer, open Microsoft Excel and go to File – Open and change the Files of Type combo box to All Files.
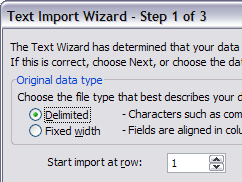
Now you should see the converted text file in the list of files. Choose it and click Open. You’ll now be brought to the Text Import Wizard. You have to open the file in this manner because if you simply right-click and say Open With Excel, all of the text for each row will appear in the first column and not be separated.
For Step 1, choose Delimited from the two options listed.
Click Next and check off the Space checkbox as one of the delimiters. Each value should now be separated by a vertical line, indicating it’s going to be in a separate column.
Click Next and then click Finish. You can now save the file as an Excel file by going to File – Save As. There are a few drawbacks, however, as this conversion does not always work perfectly! For example, if the original Excel sheet had a column where there was text with spaces included, each word will be separated into it’s own column! Also, you won’t see any formulas or functions that may have been in the original Excel sheet, only the text.
It’s as easy as that! You can use many other image editing programs also such as Photoshop, Corel, etc, etc, but I chose Paint because that is universally available on just about every Windows computer.
Any questions, post a comment!
[tags]convert pdf to word, convert pdf to excel, convert pdf to jpg, how to convert pdf file[/tags]
Installing Windows 7 on your Mac using Boot Camp is a great way to get full performance

Thus, when you use Windows 7 with Boot Camp, you are simply booting directly into Windows instead of OS X. This is a great way to run Windows on a Mac because it gives all of your Mac’s power (RAM, processor speed, etc.) to Windows.
With virtualization software, such as VMware Fusion or Parallels, your Mac’s power (RAM, processor speed, etc.) is being distributed between both OS X and Windows.
Decided that Boot Camp is for you? Here are some things that you will need before getting started:
*Apple just recently released an official Boot Camp update for Windows 7. Doing a software update (click the Apple logo, select software update from the drop down menu) should automatically get you this update. But just to be sure, you can get it here).*
Step 1: Navigate the path Finder > Applications > Utilities. Double click the Boot Camp Assistant icon to launch it.
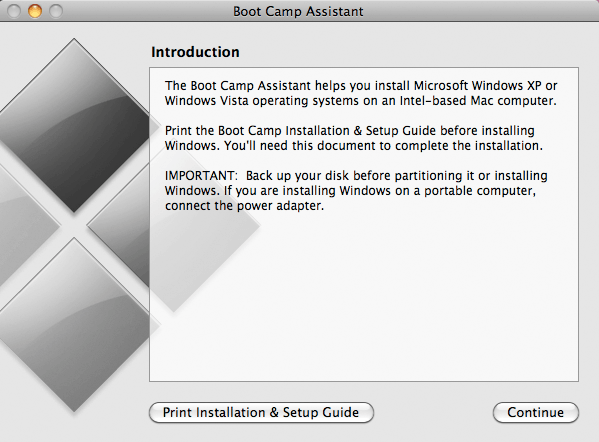
Step 2: Click Continue on the Boot Camp Introduction screen to proceed to the next step.
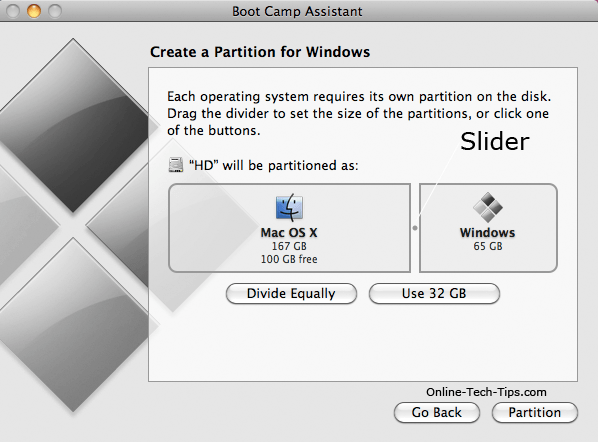
Step 3: Step 3 is the partitioning of your Mac’s hard drive. For Windows 7, Apple recommends using at least 16GB to hold Windows 7. Most likely, you do not need this much space to actually install Windows 7.
However, if you plan on installing any programs within Windows, or having any significant amount of files on Windows, be sure to partition your hard drive accordingly.
Click the Partition button. Wait for Boot Camp Assistant to partition your hard drive. Once it finishes, you should have a BOOT CAMP drive icon on your desktop.
Step 4: Insert your Windows 7 install disc into your Mac’s DVD drive and wait for it to load and recognize. Click the Start Installation button from the Boot Camp Assistant screen.
Step 5: Your Mac should automatically restart and boot into the Windows 7 installer, rather than OS X. The next screen that you come to will be a prompt screen, allowing you to choose which partition to install Windows 7 on.
Make sure that you select the BOOT CAMP PARTITION that you just created, by clicking on it once to select it. Click the link that says Drive options (Advanced). Click the Format button. A prompt screen should pop up saying “This partition might contain…”. Click OK.
Step 6: Windows should now be installing on your computer. Throughout the installation process, Windows will reboot itself a couple of times and you will be required to eject the install disc from your Mac’s DVD drive.
Do this and let Windows, finish installing completely. Fill out your Name, language, etc. Upon successfully installing Windows 7, you need to do a Windows Update to get the latest fixes and Windows released drivers. Restart your computer before proceeding to the next step.
Step 7: Once Windows boots back up, you need to install a couple of additional drivers. Insert your Mac OS X disc into your Mac’s DVD drive and wait for it to load. Click the Run setup option from the prompt window.

Step 9: Let the installer complete, it may take a couple of minutes. After it completes, click the Finish button to exit out of the Boot Camp installer window.
Step 10: Eject the Mac OS X install disc from your computer and restart your computer.
Using Boot Camp: That’s all there is to it. Boot Camp and Windows 7 should now be running on your Mac. Upon powering on your computer (right when you hear the chime), hold down the option key on your Mac to go to the boot menu. From here, you can choose if you want to use OS X or Windows 7.
» Filed Under Mac OS X